New Jazz Etude: 4ths and 5ths With Chromatic Passing Tones

This image has an empty alt attribute; its file name is Screen-Shot-2019-08-22-at-2.58.08-PM-1024x173.png

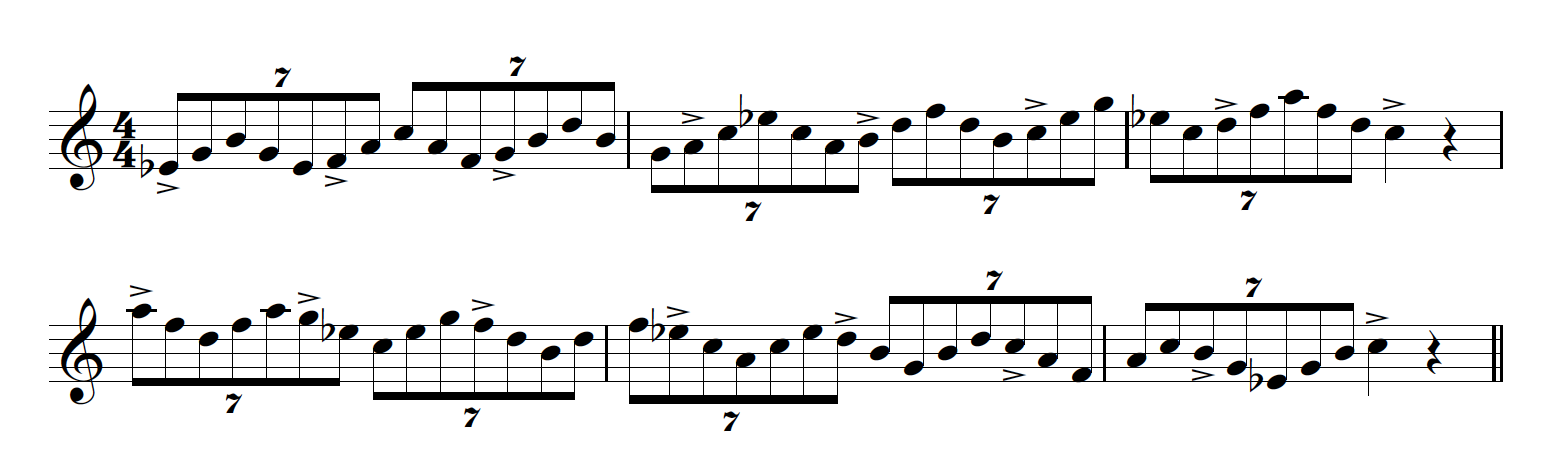
My aim in composing this etude arose from an interest in exploring the sound of ascending perfect 5ths over ii-V7-I chord changes. And in my explorations, I also discovered an easy and practical way to use chromatic passing tones to help make my melodic line have a nice, flowing sound and feel. Take a look at the example above.

I begin with two ascending perfect 5ths starting on the root of the ii chord (“D” from the Dm7 in the example). The fourth note is an Eb, which functions as a chromatic passing tone that leads to the E natural on the third beat of that measure. I then descend with two fourths: E natural to B (perfect 4th); then the B descending a tritone to the F natural. I then use an F# as a chromatic passing tone that leads up to the G natural in the second measure, which continues upwards with two perfect 5ths (G moving to D; D moving to A).

As a variation from the original four-note pattern, I add another G natural as the fourth note, which then connects chromatically with the Ab on the third beat of the measure. Starting on the Ab, I move downward in perfect fourths (Ab, to Eb, to, Bb, to F natural). Not only does this pattern of 4ths compliment and “mirror” the quality of the previous perfect 5ths, but it also adds a good deal of altered tension over the V chord (G7); specifically: -9, (Ab), -13 (Eb), +9 (the Bb functioning as an enharmonic version of A#), and 7 (F natural).

The F natural goes on to connect (again, via half-step) to the E natural (the 3rd of the CMaj7 chord) in the third measure, which once more starts the ascending perfect 5ths pattern. The fourth note of the measure (Bb) is used as a chromatic passing tone that resolves to A natural, then the line ends with a mix of perfect 5ths and major seconds. There is most definitely an “angular”, more “modern” sound to the melody, but it fits easily within the harmonic structure, and has enough other elements to vaguely hint at the bebop language.

If you’d like to explore using wider intervals in improvisation, please consider my e-book, The Vertical Saxophone (which, by the way, is applicable to any melodic instrument). If you’re interested in going more deeply into how to use chromatic passing tones to connect melodic ideas, please consider my e-book, Four-Note Diatonic Triad Cells. And if you’d like to work through some unique ideas you can apply specifically over the ii-V7-I harmonic progression, please consider another of my e-books, ii-V7-I: 40 Creative Concepts for the Modern Improviser. For a free, downloadable pdf of this etude, click the link below:

4ths-and-5ths-With-Chromatic-Passing-Tones.pdf

Clarifying A Common Misconception About Your Lungs To Help You Breathe More Optimally

Uploaded to www.sxc.hu for use.

Many of the chronic problems wind instrumentalists and singers encounter with breathing are due, in part, because of misconception.

In particular, misconception of the structure, function and coordination of the mechanisms involved in both natural (passive) and extraordinary (as in playing or singing) breathing.

I’d like to address and clarify a very common misconception here in this post: the size and location of the lungs themselves.

Let’s start by some of the things some musicians think they are doing with their air:

“I’m putting the air down there in my belly.” Or, “I’m placing the air down into my diaphragm.” And other ideas to this effect.

I won’t digress here about why it’s impossible to “place the air down in your diaphragm”, other than to say that the air you inhale never goes directly into your diaphragm.

It enters into your lungs. Simple as that.

The primary function of your diaphragm is to assist in changing the size and shape of your lungs to facilitate inspiration and expiration. It does this in concert with your intercostal muscles (the muscles between your ribs), as well as with other auxiliary muscles.

So where are your lungs, exactly?

Well, they’re higher up and further back in your body than you might have thought. Here’s a simple, animated video from the DVD entitled, Move Well, Avoid, Injury, to help you get a visual on all this:

As you can see, the air doesn’t actually go into your “belly”. The three-dimensional movement of your abdominal area is largely on account of the displacement of the abdominal content, because of the movements of the diaphragm and ribs (and other structures, as well.)

So what’s the possible downside of trying to “put the air down there in your belly”?

Well, in the simplest sense, by trying to do the impossible, you’re most likely also interfering with your natural, optimal breathing coordination.

Whenever I see a wind instrumentalist trying to “put the air into the belly”, I typically also see a stiffening up of the neck and shoulders, accompanied by a downward compression of the head on top of the spine, and a narrowing, or hollowing, of the lower back.

All this tends to prevent the ribs from moving freely enough to sufficiently (and efficiently) transform the internal dimensions of the thoracic cavity (the part of your body including, and inside of, your ribs) that facilitates the movements necessary for full and dynamic breathing.

So take a good look at the video I’ve posted here. Notice the size and the specific location of your lungs, along with the range of movements the lungs go through via the actions of the ribs, diaphragm, and other muscles. By clarifying this misconception, you might very well discover a new freedom, flexibility and fullness with your breathing that had been eluding you in the past. Enjoy!

The Importance of Understanding Your Human Design

A good percentage of musicians who seek my help as an Alexander Technique teacher do so because of chronic pain when playing their instruments.

And with some, it might not be because of pain, per se, but because of a palpable sense of strain and misdirected effort as they play.

Though the source of (and solution to) their problems vary, virtually all these musicians have one thing in common that is exacerbating their condition. Specifically, misconceptions about their human design in relation to making music on their instruments.

The thing that still amazes me after all these years of teaching, is that many of these misconceptions (that are causing some serious problems!) could so easily be remedied by taking the time to study and understand some very basic functional musculoskeletal anatomy and physiology.

Serious musicians give great attention to so many details of their craft and art. Sometimes obsessing over finding the best equipment, they also practice and study diligently and passionately, and are always on the lookout for anything to help them do what they do better.

Yet, as I’ve mentioned, far too many of them neglect to take the time to gain an accurate and detailed understanding of the workings of their most essential, primary instrument: themselves.

And that’s too bad. Because it is such a small, easily doable thing, really. In fact, sometimes just clarifying an anatomical reality is all it takes to solve a particular, debilitating problem.

Even spending a few hours studying and better understanding your design can make a significantly positive impact on how you practice and perform.

And if you teach, having this knowledge is not only essential, it is part and parcel of your responsibly to your students. They will have a far greater chance at success when you’re teaching them through the lens of anatomical and physiological accuracy.

So yes, understanding your human design is important. Very important.

The good new is that nowadays there are so many great, easily affordable and accessible resources to help you get the information you need.

I recently came across what I think is perhaps the most essential book on understanding our human design as it relates to any kind of movement and activity (including playing music!)

It’s entitled The Body in Motion: Its Evolution and Design. Written by Alexander Technique teacher, Neurodyamics specialist and scholar, Theodore Dimon, Ed.D, it functions as both an in depth tutorial and reference for how we are designed to move.

The thing I like most about it is that each aspect of our anatomical structure is introduced and described relative to our evolutionary development, and in particular, our unique upright, bipedal design.

The book starts by laying the groundwork for the origins of animal movement, and how a system of muscles and bones came to be. Though this might sound like just an interesting (or not) story, it is much more than that.

By helping you understand how we evolved, based upon environmental need, the author is also helping you build a foundation in understanding how all our musculoskeletal structures work together as an interdependent whole. (This is very important, and can help you to avoid a good deal of dubious information floating about in this day and age of the internet.)

Dr. Dimon goes on to demonstrate and explain the most essential aspect of our ability to produce skilled movement: our upright support. It is this system of support and suspension that serves as the foundation for the complexity of all human movement.

From here, he elucidates upon the various structures essential to this movement: the spine, shoulder girdle, limbs, (including the hands), and then onto the mechanisms of breath and voice and more (including muscular spirals, etc.)

The text is clear and concise, and always introduces new ideas/concepts/chapters in relation to the previous ones, tying everything together under the central organizing principle of our unique, upright human design.

It is written with the layperson in mind, and if you’re new to musculoskeletal anatomy, you won’t be overwhelmed with a litany of scientific terminology. Just essential, practical information.

The book is also very nicely and abundantly illustrated by G. David Brown, so that whatever the author is presenting, is supported by visuals. Part of this visual support includes simplified drawings that demonstrate the mechanical principles of how bones and muscles work together. (This is immensely helpful!)

At only 107 pages, it’s a brief introduction into the most fundamental aspects of this wonderfully efficient design! You could probably read the entire book over a weekend. But the information you glean from it could positively impact you for the rest of your life. Highly recommended!

New Jazz Etude: Implied 5/4 Over Minor to Major Turnbacks in 4/4

Here’s a line that is inspired by Stan Getz’ classic solo on Stella By Starlight (from the album, Stan Getz Plays, where he so masterfully uses polymeter to create an interesting rhythmic tension in the final cadences of the song form on the first chorus). The harmonic structure I’ve used here is a minor to major turnback (i.e., minor key ii-V7s that “turn back” and finally resolve to major), which also happens to be a somewhat condensed version of the last eight measures of Stella By Starlight. Take a look at the example above. If you analyze the note choices I’ve made on each chord, there is nothing harmonically complex or “exotic”. In fact, most of the melodic content is more or less outlining the chords themselves.

But what gives this line its particular surprise is how I’ve used rhythm and meter in constructing it. The first motif is a 5/4 pattern, subdivided into 3/4 and 2/4 (the 3/4 being the first six eighth notes; the 2/4 being the quarter note and the two eighth notes that follow it). The final two eighth notes of this motif (A and Ab) act as “approach notes”, or passing tones, that lead to the “G” in the second beat of the second measure, thus starting a similar melodic pattern (with some variation) of the original motif, but modulated down a whole step with respect to the new chord (E half dim7). The original rhythmic pattern (six eighth notes followed by a quarter note and two eighth notes) is then stated again, but this time displaced by one beat (hence, the 5/4 over 4/4).

You’ll notice that the quarter note has been rhythmically displaced, moving from beat four in the first measure to beat one of the third measure. On the third beat of the third measure the rhythmic pattern varies again, but still implies a 5/4 organization, with the B natural acting as the fifth beat of the 5/4 pattern. So the entire pattern fits into 15 beats, giving the impression of the time turning around significantly against the 16 beats of the four-bar harmonic form. Spelling out the C maj7 gives the entire melodic line a strong sense of release against the previous harmonic and rhythmic tension. If you practice this over a backing track you’ll most clearly hear the harmonic/rhythmic tension, but even practicing it with a metronome clicking on beats two and four, you’ll still get the feeling of the cadences being displaced against the 4/4 form.

If you would like to explore these concepts further, please consider my e-books, Essential Polymeter Studies in 4/4 for the Improvising Musician, and ii-V7-I: 40 Creative Concepts for the Modern Improviser. For a free, downloadable pdf of this etude, click the link below:

5/4 Implied Over Minor to Major Turnbacks in 4/4-pdf

Time and Rhythm: Discovering the Magic Between the Beats

“Many people think that how they commit to the metronomic beat is the only game in town. But in bebop, the game in between this beat and the next one is really the main game.”

-Charles McPherson

“The metronome is not my sense of time. My sense of time lies between the metronome clicks.”

-Bill Plake

Well, I have at least one thing in common with alto saxophone great Charles McPherson. We both agree about our relationship to time (and how we perceive it).

Many musicians who seek my help in improving their sense of time and rhythm tend to have this more “passive” approach to the beat, as described above. This is, in part, because they view playing with “good” time as some kind of burden, as something they are obligated  to do in a rather precise and inflexible manner.

But playing with “good” time is not a burden. It is a liberator,  making your music more vivid, along with optimizing your skill and coordination.

And for you to play with “good” time, you need to be flexible and dynamic in two specific ways:

First, you need to be flexible and responsive to the time/rhythm/feel nuances of the other musicians with whom you’re playing.

Second, you need to have a dynamic rhythmic imagination.

It is this “dynamic rhythmic imagination” that I wish to address here.

No matter what kind of music you’re playing, “between the beats” is where all the possibilities lie. If you’re playing “interpretive” music, lets’ say, Bach, for example, it is your imagination of the “unevenness” (the emphasis and de-emphasis) of each of the eighth notes in a particular phrase that give it a unique expressive quality.

In other words, it is how you “imagine” the eighth notes relative to the beat  that puts your personal stamp on the music.

If you’re an improvising musician, on the other hand, it’s not just how  you imagine the eighth notes relative to the beat, but also what  you imagine rhythmically.

By “what”, I’m talking about the complexity and richness of your rhythmic expression. I’m talking about more than just continuous eighth (or sixteenth) notes.

Syncopation, polyrhythm, metric modulation, polymeter…even silence…all of this can be part of your rhythmic imagination. The “game in between this beat and the next one”, as Charles McPherson says.

And for sure, as an improvising musician, the “how” of how you play your eighth notes, sixteenths, etc., relative to the beat, is a vital component of your expression. (I think of this as a part of your “time feel”.)

But the bottom line is that none of this happens without consciously strategic and constructive work. In the simplest sense, that means working on two specific skills:

  1. Your sense of pulse (your ability to imagine and accurately predict) the beat (or “clicks” on the metronome).
  2. Your ability to imagine and move with an ever-expanding vocabulary of rhythmic expression relative to that beat.

The key word here is imagination.  When you’re practicing, that might mean using a minimal amount of metronome clicks relative to the rhythm being explored.

So for example, if you’re working on feeling eighth-note septuplets (seven notes played within two beats), it would make little sense to set the metronome clicking on each eighth note of the septuplet. Doing so might make your eighth notes sound “more even and precise”, but will do nothing for your rhythmic imagination. Ultimately, it is your carefully cultivated “rhythmic imagination” that will make your rhythms most precise, whether your playing by yourself or with others.

It would be more beneficial to set the metronome click in three ways. From easier to more challenging, these are:

  1. One click per each septuplet.
  2. Two clicks per each septuplet. (Believe it or not, you’ll most likely find this to be a bit more tricky.)
  3. One click per measure. (So, in 4/4 that would be one click for every 14 notes)

Once you’re able to do all this fairly readily, next would be to displace the click of the metronome relative to the septuplets, perhaps having it click beat two of each measure (or if you’re really up for a challenge, having it click on the “and” of beats one and three!)

Working on rhythms with this kind of intention and precision yields remarkable results, whether you’re an interpretive or improvising musician. The music “between the beats” comes alive inside of you with sometimes startling energy!

I’ve composed an e-book filled with exercises to help you enrich your rhythmic imagination, as well as to improve your ability to predict  the beats. Working daily in this way will help you build measureable skills that apply to whichever kind of music you play.

In any case, I encourage you embrace Maestro McPherson’s assertion, and discover the magic between the beats. Here’s a link to Ethan Iverson’s excellent interview with Charles McPherson. Enjoy!